The Overstrung Underdamper Piano
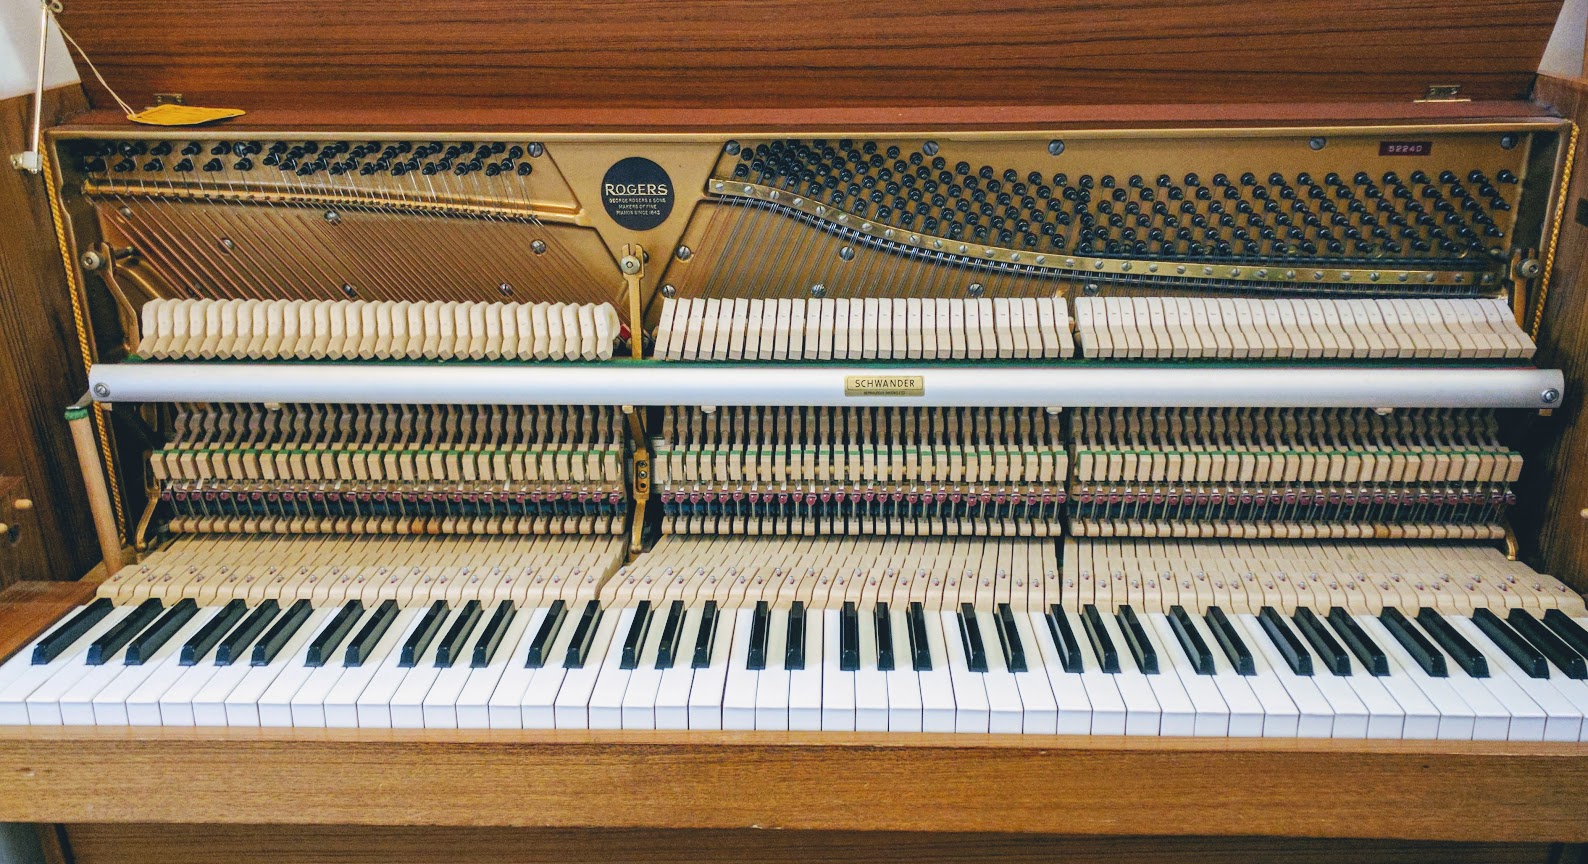
This consists
of three assemblies; the strung back, the casework and the action and keys.
1. The strung back.
This is the chipping back that we have already dealt with. The bass strings
go across and over the tenor strings so that a longer bass string can be put
into a shorter three‑quarter frames. And they all have webbed frames which
means that the iron frame covers the wrest plank apart from holes drilled in
it for the wrest pins to go through into the wrest plank. Iron frames are
now produced from a stronger type of iron which is called spheroidal iron.
In this the carbon is contained in the iron layers in spherical shapes
rather than as flakes making the whole structure more integrated. Also iron
frames are cast in synthetic throwaway moulds, the plastic lasts just long
enough for the frame to be cast. In this way many frames can be made at once
as there are plenty of master moulds and the standard of frame cast is
exceptional and needs less finishing.
There is still a
trend for very small pianos but a good musician will want the piano to have
a good tone as well as an attractive appearance. It should be noted that
with small pianos the bass strings are very short in length and made very
fat with thick copper winding to get the required frequency. This makes the
tone dull and heavy as the string becomes more and more bar like. To
compensate for this the tension that the bichords are put under is increased
15% compared to the non‑weighted tenor strings. Then the monochords are put
under 15% more tension than the bichords. This is normal practice for the
bass strings.
Another feature of
the modern braced back is the absence of back bracings (backless pianos)
which makes the piano much slimmer so is the feature of
the small pianos.
The iron frame is stronger and tuning stability may not be as good as in a
braced piano.
New materials are
creeping into the strung back; synthetic plastic wrest pin bushings. Plywood
occasionally is used for the suspended bass bridge and even in the long
bridge.
2. Casework. Now
more simplified, unnecessary mouldings dispensed with. may be a single half
top, panel‑less top door, no separate lock rail no music desk just a music
tray, cheeks and ends moulded as one piece.
Many different
veneers are stuck to the core wood, oak, mahogany, walnut, teak, rosewood,
sapele. The core wood may be chipboard or blockboard or even a fibre resin
board with a synthetic veneer finish (high density fibre h.d.f. board) ‑
from pulp mitre. Polyester, polyurethane and cellulose finishes are used
which just need dusting rather than the old fashioned french polish. Far
cheaper and quicker to apply these finishes.
Castors instead of
being made of mild steel or cast steel may now be rubber‑tyred to run
smoothly over floors without leaving an impression.
3. The action, keys
and pedal work. As before we shall deal with the framework of the action
first.
Action standards .
the early underdampers tended to still have the wooden variety but all the
recent ones are of cast iron, mild steel or aluminium alloy. There are
usually 3 now instead of 2 which gives the action beam rail more support and
there should be less movement of this rail through the years. Mini pianos do
still have wooden standards. The action standards are held at their bases by
the action cups on the action blocks and the tops are held by the action
bolts and action nuts. These
items are made of
mild steel apart from the blocks which are beech.
Action beam rail .
if there is a third action standard, the action beam rail no longer needs
the support of a metal bar screwed to its front surface. It is a highly
machined rail with about 280 screw holes in it made from maple or hornbeam.
In the very modern pianos it may be made of aluminium alloy and therefore
screws with metal threads are used for the action parts. Yamaha and some of
kemble's pianos are examples of this. Its funation is to hold all the action
members in position as well as the smaller rails; the jack slap, damper lift
rail and set‑off rail.
Damper lift rail.
This is completely different from the overdamper version. It is now fixed to
the action beam rail by 4 bushed hinges. It arcs between the beam rail and
the damper tail cloths. On the earlier underdampers the small screws for
these hinges impinged on the space for the nearby damper and butt screws, so
therefore the butt and damper screws had to be shorter. If you remove sets
of dampers or butts, make sure these shortened screws go back in exactly the
right places. The rail is a length of circular mild steel with a flattened
right angled end where the pedal rod lifts it. It is liable to rust causing
excess wear of the damper tail cloths. This rail lies just above the damper
spoons on the lever bodies.
Set‑off rail . may
be in 1, 2 or 3 sections with on average 3 securing screws per section. The
basic structure is the same but new materials have crept in. The set‑off
buttons may now be plastic, the set‑off wires may now have a spade end
instead of the looped variety. You may find a strip of cushion felt on the
back of this rail, in which case the jack slap rail will be absent as the
set‑off rail performs two functions. This is not so good because you cannot
regulate the jack slap rail individually.
Jack slap rail or
repetition rail. Again this is exactly the same as in the overdamper action,
the only change is that the double‑threaded screws may turn in the same
direction as conventional screws. This whole rail may be completely absent.
Damper slap rail.
This is a new rail screwed to the back of the action standards with its back
surface covered in cushion felt. It is made of maple or hornbeam. Its job is
to slap back the damper wire should the head fly too far off the string so
that it takes too long to get back.
Hammer rest rail.
this rail has changed from the overdamper action because of the new systern
on the soft pedal called the half‑blow system. Instead of the celeste rail
separate from the action, to quieten the blow, there is a half blow rail
hinged on the hammer rest rail which moves all the hammers closer to the
strings. With the reduced blow distance the volume is decreased. In very
modern actions even the half blow rail may be absent if the hammer rest rail
pivots on the action standards. In these cases the hammer rest rail consists
of the rail itself plus the hammer rest baize strip. Apart from the usual
maple, the rail may be wooden with brass or tin skin or even completely made
of aluminium alloy.
Half blow rail .
this is hinged to the hammer rest rail by 4 flanges which are made of
hornbeam, maple or plastic. the rail is covered in nameboard felt and topped
with the hammer rest baize strip which the hammers sit on. It is made of
maple, hornbeam or pine or lately even aluminium alloy. In the bass end a
metal arm is screwed to it which hangs beyond the action standard so that
the soft pedal rod can lift it. Though this is called a half blow rail it
probably only lifts the hammer about a third of the way to the strings.
Underdamper action
members.
1. Hammers (top
sections). There are numerous differences between hammers of an overdamper
and underdamper both in design and new materials. Assuming the piano to be
an overstrung one, the hammer heads will be of different lengths, shorter in
the bass and longer in the steel section.
This is to
accommodate the uniform blow distance. The hammer heads are now set at an
angle on the top of the hammer shank to try and align with the angle of the
overstringing. All the bass hammer heads are of a uniform angle, but the
hammer heads of the steel section start at a severe angle but then gradually
reduce as the treble section is reached. You will notice the "understringing"
of the tenor section is at an oblique angle compared to the more vertical
stringing of the treble section. The shanks of the underdamper hammer are
stin of maple or hornbeam, but certainly not cedar. the butt has changed, it
now has a butt spring which helps the hammer return to rest from the
checking position to improve repetition.
"The rake of the
hammer" this is the distance off the vertical that the hammer shank is when
the nose is on the string. It is a quarter of an inch measured just below
the hammer head. If the shank is vertical when the nose is on the string the
hammer will tend to bounce (not check). On the underdamper action the hammer
heads need to be longer to pass over the dampers and still have a decent
rake. This is also why a butt spring has become necessary, to get the hammer
into check. On the overdamper action the hammer head does not pass over the
dampers.
There are two types
of butt spring, left and right varieties and 3 different lengths,
three‑quarters, seven eighths, one inch. So in total there are 6 possible
butt springs. Made of brass or nickel plated brass. The left‑hand butt
springs have a long tail to weave in and out of the butt, it holds on one
side and tends to lean over so has been superseded by the right‑hand
variety. This type is held through its coiling by spring cord which has
centre fibres with a woven sleeve. It is much better because it is held
centrally and uses all the strength of the coil. Because there is a butt
spring there is now a looping cord glued onto the butt flange. The butt
flange is screwed to the front of the action beam rail not the back so the
flange recess is on the back.
A new feature is
the german butt plate which is a small mild steel plate screwed onto the
back of the butt, clamping the centre pin down. It makes decentring very
easy but the butt plate screw can get loose and give the effect of a loose
centre. Its name suggests its origin, but yamaha actions use this design and
some of kemble's.
Some of the actions
today are made with black plastic flanges with the usual bushing cloth glued
in the centre pin holes. The bushing cloth does seem to come out more easily
than a woqden flange. Centre pins may be tin plated or nickel plated brass.
A very recent
feature is the "floating centre" or plastic centre pin bushing; it consists
of an inner and outer ring joined only in a fraction of their
circumferences. If the pin or wood expands or contracts the space between
the inner and outer rings changes but leaves the friction on the centre pin
constant. The centre pins for this type of
busing have to be
more accurately machined. The plastic bushing is pressed into a conical hole
in the arms of the flange. Barratts and robinson who patented floating
centres are no longer in production.
A further change is
to do without the bushing completely by making the flange of "selflubricating"
plastic as found in the bentley actions which are now defunct.
Amidst all this
change the notch has remained the same with the same materials also, the
balance hammer has changed shape slightly but again the same materials used.
The tape ends may now be made of leather or fabric reinforced plastic (f.r.p.)
which can be double‑sided. Cheap tape ends may be just reinforced paper.
Underdamper lever
section
There are a few
differences between the lever of an overdamper and that of the underdamper.
The most fundamental is the presence of the damper spoon on the underdamper
lever. To fit this the lever body is extended beyond the lever flange and in
fact, the lever body is no longer extended beyond the bridle wire to
accommodate the hole for the damper wire. The means by which the lever lifts
the damper, has moved from one end of the lever body to the other. This is
the only design change, other changes are purely inf the types of material
used.
Jacks; instead of
maple or hornbeam, may be made of black plastic which is so smooth that it
does not need burnishing. It still has bushing cloth for the centres. If the
jack is made of hornbeam or maple, in recent underdampers the burnishing
occasionally may be a teflon spray (like non‑stick saucepans) instead of the
old black leading. Jacks may centre directly to the lever or via a jack
flange. Please notice that the body of the jack is slimmed in order to give
clearance of the support screws for the set‑off and jack slap rails.
Lever flange may be
of h or m or of plastic. Two types of plastic are used, the more common
black plastic which required bushing cloth for its centre and the less
common white self‑lubricating plastic. This does not need a centre pin
bushing, the pin goes directly into the flange. Don't forget the floating
centre is used for lever flanges in barratt and robinson pianos.
Lever bodies still
made of maple of hornbeam through the lever heel is usually absent in the
smaller pianos so you find hard‑wearing boxcloth stuck directly to the
underside of the lever where it contacts the key capstan or dolly.
Damper spoons made
of mild steel with fluted ends punched into the end of the lever body. Very
liable to rust with damp causing the damper tail cloth to be eaten into by
the spoon (clean with fine wire wool).
Jack spring, spiral
or repetition spring. made of brass or nickel plated brass. If there is a
jack flange, its base is stuck to the lever body.
The check wires and
bridle wires may now be nickel plated. Check heads and check felts are much
the same as the overdamper versions.
Prolongs or
abstracts are extensions of the lever bodies found in some of the older and
very tall pianos. The keyboard must stay at a reasonable height even if the
strike line is near the top of the piano so an extension is needed between
the key and lever. The prolong is centred to the lever where the heel would
normally be and the end of the prolong sits on the pilot cloth of the key.
The bottom end of the prolong is steadied by a small arm being centred to
it. This small arm is itself centred to a flange which is screwed to a
special rail lying below the action beam rail. This means that the lever
section instead of having 2 centres has 5.
The underdamper
section
This is completely
different from the overdamper section as it now mutes the string below the
hammer strike line instead of above. It is far more efficient to damp just
below the hammer strike line than above. The damper unit is now screwed to
the action beam rail instead of having its own separate rail. The second
major change is the use of a spring to damp instead of lead weights which
obviously use gravity.
The damper head
consists of the head moulding (h or m) which is covered with nameboard felt
and topped with the damper felt made from merino wool. The different colours
of the nameboard felt highlight the white damper felt. There are 4 types of
damper felt. for the single (monochord) strings clip felt is used. It is
like a block of felt with a "v" cut made in it, in which the string lies.
For the bichords, wedge felt is used which is triangular in section and
merely wedges between the two strings. For the first few trichords in the
tenor section split wedge damper felt may be used. It is exactly like the
wedge felt but there is an extra cut down the apex of the triangular section
so that there are two smaller wedges. Where the length of the damper head is
curtailed by the cross‑over of the overstringing, the split wedge felt gives
more effective damping than the flat variety. Finally for the majority of
the trichords there is flat damper felt. On all these felts the fibres run
parallel with the strings, not end on as with the overdampers. Each damper
head has normally two pieces of felt per head, though there may even be
three in some bass sections. there are 4 types of felt but there are 5
combinations because some uprights may have split wedge and flat on one head
in the scale region. This is common on grands. There are usually 65 dampers
per piano though technically there could be 88 or 85.
Fly dampers. On
quality pianos these may be found on the bottom bass singles and/or bass
bichords and/or the first few notes of the tenor section. The aim is to
improve the damping by damping below and above the hammer strike line.
Attached to the normal head is the fly damper head wire which goes behind
and between the strings and reappears above the strike line holding the fly
damper head onto the string. The fly head is far smaller. These are very
difficult to set up properly.
The damper head is
glued to the damper drum (m or h or p) directly or with a piece of boxcloth
or cushion felt between. The d. drum is held to the d. wire by tightening
the d. drum screw (m.s.). the d. wire has a fluted end punched into the d.
stem or body (h. or m.). near the top of the d. stem is the felt lirred or
burnished groove in which the top of the spring pushes. The d. flange is
centred to the stem half way down and it is this which holds the d. spring.
Notice that the d. stems are angles over in accordance with the angle of the
strings, they are not always upright.
The d. springs are
made of brass wire and vary in thickness according to their position in the
piano. The bass dampers have thicker wire, the tenor section has medium and
the last 10 or so dampers have the thinnest wire. The springs are held into
the flange by spring cord going through the spring coiling. The d. flange
may be made of m. or h. or p. both the black plastic and bush‑less white
plastic is used according to the piano make. If it is a barratt piano, it
will have the "floating centre".
Below the d. flange
is the part of the d. we call the d. tail which has the d. tail cloth on.
This is made of boxcloth (rarely of leather) and is the part of the d.
against which the d. iift rail and d. spoon operate against. If there is a
small grub screw pushing the d. tail cloth outwards, it is there to regulate
collective lift of the dampers. If the d. spoon or d. iift rail get rusty,
then the d. tail cloths will wear out very quickly.
Pedal systems on
the underdamper, overstrung piano.
The principles are
much the same as the overdamper pedal system but the pedal hinge is now more
normally found on top of the bottom board. Also there could be a third pedal
present between the 2 usual ones.
1. The sustaining
pedal, loud pedal or forte pedal. This does exactly the same as in the
overdamper piano, it lifts all the dampers clear of the strings to allow
sympathetic vibration. Do not forget the dampers are now attached to the
action beam rail, so the damper lift rail must also be. Iet us follow the
pedal movement from the contact by the pianist's foot. the pedal goes down
pulling the pedal hook and thereby the end of the rocker. The opposite end
of the rocker goes up as well as the rod which sits on it. The rod is
steadied by a bushed guide socket near its top of if this is absent, a pin
in its end goes through the damper rail iift arm. The rod pushes the damper
lift arm up so that the rail rotates upwards and closer to the strings in a
small arc. The damper tails are pu$hed towards the strings meaning that the
heads move off the strings.
The pedal hinges. 3
types, the first is simply 2 wooden blocks with holes in. The end of the
pedal has a pin going through it and the exposed parts of this pin are
accepted into the wooden blocks. Instead of wooden blocks you may now find
plastic hinges. In the second type the end of the pedal has a hole in it
through which a screw goes. the hinge is "u" shaped", the pedal is clamped
into the hinge by a screw and nut. In the third type the pedal is nipped in
the hinge. The end of the pedal has small craters either side into which a
fixed pin and an adjustable pin goes.
The rocker. May
pivot on the cradle system (like a big flange) and have a leaf or coil
spring to return it to the playing position. Or have the common "u" spring
to return it to the playing position. Or have the common " u " spring which
pivots and returns. It may have a "z" or "t" spring which is a variation of
the "u" spring. The cradle system is the best.
Materials. Pedal,
loud pedal or forte pedal. This does exactly the same as in the overdamper
piano, if lifts all the dampers clear of the strings to allow sympathetic
vibration. Do not forget the dampers are now attached to the action beam
rail, so the damper lift rail must also be. Let us follow the pedal movement
from the contact by the pianist's foot. The pedal goes down pulling the
pedal hook and thereby the end of the rocker. The opposite end of the rocker
goes up as well as the rod which sits on it. The rod is steadied by a bushed
guide socket near its top of if this is absent, a pin in its end goes
through the damper rail lift arm. The rod pushes the damper lift arm up so
that the rail rotates upwards and closer to the strings in a small arc. The
damper tails are pushed towards the strings meaning that the heads move off
the strings.
The pedal hinges. 3
types, the first is simply 2 wooden blocks with holes in. The end of the
pedal has a pin going through it and the exposed parts of this pin are
accepted into the wooden blocks. Instead of wooden blocks you may now find
plastic hinges. In the second type the end of the pedal has a hole in it
through which a screw goes. The hinge is "u" shaped, the pedal is clamped
into the hinge by a screw and nut. In the third type the pedal is nipped in
the hinge. the end of the pedal has small craters either side into which a
fixed pin and an adjustable pin goes.
The rocker. May
pivot on the cradle system (like a big flange) and have a leaf or coil
spring to return it to the playing position. Of have the common "u" spring
which pivots and returns. It may have a "z" or "t" spring which is a
variation of the "u" spring. the cradle system is the best.
Materials. pedals,
pedal hook, pedal hinge, " u " "z" "t" springs are of mild steel or sprung
steel for the springs. Pedal horn or capping is of brass. Pedal rocker and
pedal rod usually pine. Pedal cradle or hinge blocks are hardwood, eg beech.
pedal hole in the plinth is lined with baize. If there is a pedal rod pin it
may have a rubber gromet on it to prevent noises with the damper lift rail.
The total movement in the pedal system is governed by the size of the pedal
hole in the plinth.
2. The soft pedal
or half blow pedal.
The lower part of
this system is the same as the sustaining one but the pedal rod is longer as
the half blow lift arm is higher on the action than the damper lift rail
arm. the upward thrust on the pedal rod causes the half blow rail to rotate
on its ~ flanges, tipping all the hammers towards the strings. With this
reduced blow distance there is a reduced impact on the strings and hence
less volume. To regulate this pedal, there shouid be a very small delay
before the rail is lifted by the pedal movement. though called a half blow
rail the hammers are not pushed half way toward~ the strings, perhaps a
third or less. the real test is whether you can hear a difference in volume
between the pedal being on and off.
3. If there is a
third pedal between the other two it may do one of three things the most
common is that it operates a celeste rail to come down between the hammers
and the strings. This is termed a practice pedal. very rarely this pedal may
operate a split sustain system whereby it will only lift the bass dampers
off the strings. In a very few american and yamaha pianos it may be a "sustenuto"
pedal which will only hold up dampers on the notes that are actually being
played at the time of pressing. Notes played after are unaffected. this
system comes from steinway grands. There are many, many variations of pedal
systems, the principles are usually the same, you will need to investigate
to discover more combinations.
The keyboard of the
overstrung, underdamper piano.
The keys are still
made of basswood or pine, though on the now defunct lindner pianos that used
plastic but they had trouble with breaking keys. plastic is being used for
key bushings eg barratt and robinson pianos. There are two types of plastic
bushings, self‑regulating and ordinary. the self‑regulating ones work in the
same way as the floating centres. The inner and outer l‑ayers are joined
apart from where the pin touches the bushing so it allows for swelling or
shrinking of the wood. These are used for the balance and bat pin which
would be round. The ordinary plastic pushings are single layer. Bushing
cloth is still preferred by the majority of key makers.
In order to make a
piano smaller you may find that the keys step downwards towards the lever so
that the action can be set lower. if the action is lower then so is the
strike line. This type of key would be made of 2 pieces of wood, one joined
below the other. Again on small pianos you will find key capstans (mild
steel, maybe brass coated) because they are not as tall as the old fashioned
wooden dollies.
The key coverings
themselves are nearly always plastic, both sharps and naturals. Plastic
sharps are a recent feature most of the older underdampers still have ebony
sharps or a cheaper stained wood. Only the old pianos or the classier modern
ones have. ivory coverings. Notice that the keys are normally angled
depending of their position within the compass. In the straight strung
pianos the keys were straight as they lined up exactly with the strings but
in the overstrung there are gaps between the sections caused by the
overstringing. You cannot have gaps in the keyboard so the tail part of the
key is splayed as the key fronts must be together. This causes uneven wear
on one bushing giving tilted keys.
The minipiano or
american spinet. These are about 3640 inches in height compared with the
normal 48 or so inches. In these very small pianos the strike line is
dropped considerably so that a special action system is needed to
accommodate to this. In fact the action stays the same as do the keys but
the linkage between the 2 is very different. the keys are level with the top
of the hammers so an inverted prolong or sticker is needed to link the end
of the key with the lever. This can take several forms but they all perform
the same function. the action sinks into a well formed by the keys, keybed
and the strings and it is very difficult to remove the action and even more
so to regulate this type of action. This is called a "drop action".
The 12 stages of
piano manufacture.
1. Scale making. On
linen‑backed paper all the details of the piano are recorded. The design of the
piano centres around the hammer strike line and begins with the top treble note.
The strike line in the treble is at one fourteenth, one sixteenth of the
strings' length. This is done to encourage the upper harmonics and therefore
gives a brighter tone. Towards the tenor and bass sections the strike line is at
about one seventh, to one ninth of the string length. This is to try and remove
the discordant harmonics especially the seventh whilst emphasising the sonorous
ones. A scale rod is used to transfer information from the drawing to the first
prototype. It is about 5 feet in length with 4 sides on which are marked the
item such as string length, the centre of each note and the scaling for the
bridges on the soundboard.
2.
Back making. This is the preparation and assembly of the wood for the braced
back which will also include the wrest plank.
3.
Bellying. Again the preparation and assembly of the wood for the soundboard
including the ribs to obtain a crown in the soundboard.
4.
Marking off. This is marking the position for the soundboard bridges and pins,
drilling for them and the carving of the soundboard bridges. Also fitting the
position of the suspended bridge using a preset jig for that model of piano.
Fixing the iron frame down and drilling the holes through it for the wrest pins.
5.
Stringing. Fitting of the high tensile steel strings followed by the copper
wound bass strings.
6.
Part making. the case parts are prepared in the mill of the factory. Wood is
veneered and prepared for polishing or in some cases they are polished before
assembly eg polyester finish.
7.
Fitting up. This is the assembly of the casework. Ends are glued to the back
bracings etc.
8.
Finishing. Action cups and action posts, are positioned in the piano so that the
action aligns with the strings. Shanked hammers are fitted and damper heads
glued on. Then you can install the keyframe and find the position for the
capstans. the pedal work is also installed.
9.
Regulating. Adjusting the mechanism of the action and keys to give correct touch
and repetition.
10. Fly finishing. Adding the mouldings, hinges and music desk and locks etc.
11. Tuning. Pulling the pitch up to c 528 or beyond knowing that the pitch will
drop dramatically in the first year of the piano's life.
12
toning. This is the voicing of the hammer heads by shaping and pricking needles
into the hammer felt to alter its resilience. The quality of sound from each
note played with equal strength should be as even as possible allowing for the
breaks between sections. It should be noted that iron frames, keys and actions
are usually not made by the manufacturer but are bought in and then assembled.